Computers have become a necessity in our daily life, and we use them for different work throughout the day because these computers make our day much faster and it is also very convenient as well. Meanwhile, most computers run the popular Microsoft Windows operating system. It is used widely and is also a very stable operating system. However, it is not free of issues like every other OS. Many times, users face different problems, and most of them are easily fixable.
One of the common issues is the sound crackling problem sometimes when you want to listen to music. It is related to the speaker and not really hard to fix as well. That is why we have included the top 10 methods you can try if you are facing this issue. So scroll down and try sequentially. After trying them, we are sure that you will be able to fix the sound crackling issue.
Top 10 Methods to Try to Fix the Sound Crackling Issue
Here is our detailed guide:
Plugin Your Device
Before diving to do anything, you should check once if everything is fine and working perfectly when your laptop is plugged into the power source. Because when Windows runs on battery power, it switches to power saving mode, and sometimes it limits many things to reduce power consumption. Therefore, plug in your device and check if the audio crackling issue is still happening or not. Doing this might fix the issue, and it will save you time as well.
Use Another Device to Check
You have tried the first method, and it didn’t do anything. Now, check your audio device using another device like your phone. So unplug your audio device and plug it into another device and check if the issue is there or not. If you still hear crackling sounds, then your audio device has problems. So check the cable to see if any damage is there or not. Besides, it might be some internal component issue. Therefore, you will have to take to the company customer center. However, if the audio device is working perfectly on other devices, then it is your computer’s problem. To solve this issue, scroll down and try other methods.
Update Sound drivers
Every device on Windows operating is controlled and maintained by its drivers. Drivers are nothing but software packages made specifically for the respective device. That means the sound crackling issue might be related to a corrupted sound driver. To fix this, you have to update the driver. First, turn your computer and
- Type Device Manager on the search bar located on the right side of the Windows flag and click on that when it shows up.
- After opening the Device Manager window, expand the Audio Inputs and Outputs section.
- You will see all the drivers for different devices installed on your computer. So select the device’s driver you are facing the sound crackling issue with and right-click on it.
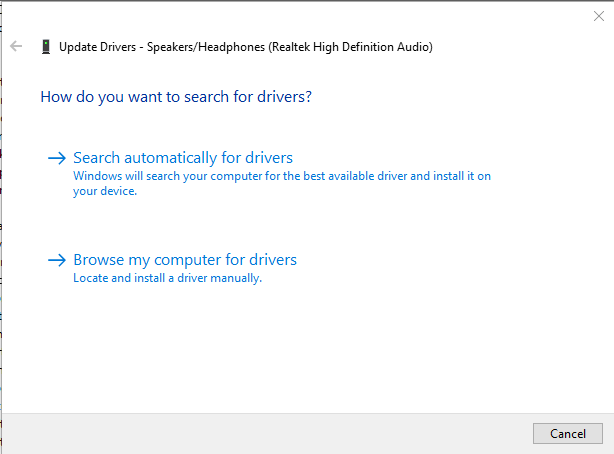
- Now you will see the Update driver option and click on that. Next, you will get two options and select the Search automatically for drivers option.
- It will check on the internet if there is any new driver update, and it will install automatically as well.
- After installing the new update, reboot your computer once and check for the issue.
Try Different Audio formats
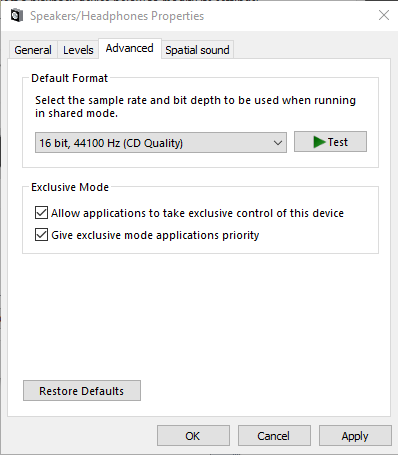
Microsoft Windows operating system has many different audio formats made for different sound profiles as well for different devices. Whenever you use a device, it selects the perfect audio format automatically. However, it can be the reason for the sound crackling issue as it might have selected a not supported audio format, or your device is not supporting the previous format now. So you have to change it manually. To do that-
- Search for the Control panel on the Windows search bar.
- After opening the Control panel, you will see a separate section named Sound. So click on that and select the device you are facing the issue with.
- Now click on the Properties option at the bottom right corner, and it will open up a new window.
- There you will find the Advanced tab and then select the 2 channels, 16-bit, 44100 Hz and click on the OK button.
- Try other sound formats as well if this one has not worked for you.
Try Different Power Settings
You will find three different power settings present on your Windows computer. These power settings are there for different uses. If you are running on the power-saving power profile, you will find that your laptop is running at a slower speed. That is why it is important to be on the right power settings all the time. You can change these settings for the taskbar by clicking on the battery icon, and you will see three options there- Better Battery Life, Better Performance, and Best Performance. Normally you should keep it in the Better Performance mode for balanced performance. Meanwhile, when your laptop is connected to the power, it should run in High-Performance mode. In this way, your laptop will offer the best performance, and everything will work flawlessly.
Apart from the taskbar, there is another way of changing power settings. To do that-
- First, search for the Control Panel on the Windows search bar and click on that.
- After that, make sure it is in the All Control Panel Options section. If you are not in this section, click on the arrow present on the top bar next to the Control Panel name.
- Now you will see the Power Options and click on that, and it will show all the options. So select the High-performance mode for best performance.

Disable Audio Enhancements
Like different sound formats, the Microsoft Windows operating system comes with many audio enhancement features to improve audio quality. One of the most used features is Spatial Sound. It is basically a free Dolby Atmos version for audio devices. It gives you the surround sound effect to offer better quality. Besides, there are other features like the Bass Boost and Loudness Equalization. So you can disable these features to check if it solves the issue or not.
- At first, type Control panel on the search bar and press enter when it shows up.
- Then go to the Sound window from the All Control Panels section.
- After that, select the audio device and click on the Properties option placed in the bottom right corner.
- Then you will see the Enhancements and the Spatial Sound tab.
- Now check the Disable all enhancements option and press the Apply button.
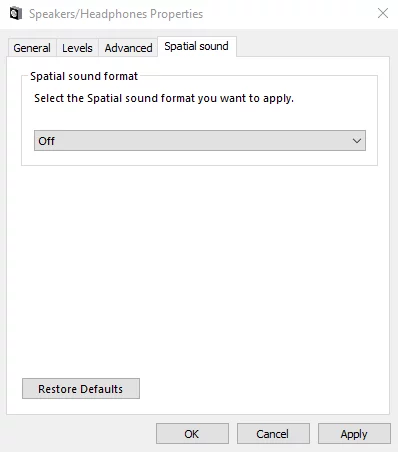
- Next, go to the Spatial sound tab and turn off the format.
- Now click on the OK button and reboot your computer.
After rebooting your computer check the audio device and listen carefully. So that you will be able to hear the sound crackling issue if it is still there.
Uncheck the Exclusive Mode
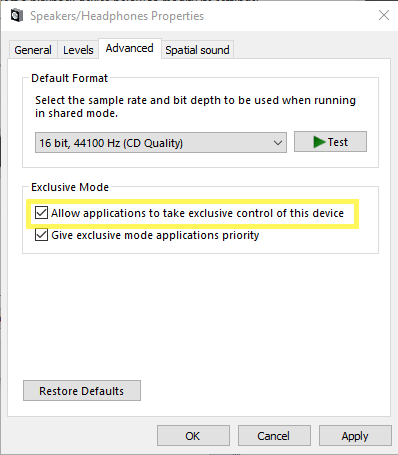
Just like other audio features, there is an option named Exclusive mode. It gives applications that you use at different times the control of your audio device. So it can also be an application-related issue. To fix that, you have to turn off this option.
- Go to the Sound window again and select the device and click on the Properties option.
- Next, go to the Advanced tab and uncheck the Allow applications to take exclusive control option.
- Then click on the OK button.
- After that, look for the sound crackling issue.
Reinstall the Sound Driver
If you are still having the issue, it is time to uninstall the sound driver. This issue is still happening because of some corrupted files present on the driver. Therefore, it is another way to fix the problem. For that, you have to open the Device Manager first. After that, identify the exact sound driver and right-click on that. There you will see the Uninstall option. After uninstalling the driver, go to your computer manufactures website and search for the driver. Then you have to download that driver and install it eventually. Next, reboot your computer, and now the issue should have been fixed already.
Use a Different Headphone Jack
Most laptops these days come with only one headphone jack. So this method is not going to work with laptops. However, if you face this issue on a desktop computer, you are good to go. You will see more than one headphone jack, usually on desktop computers. So insert the audio jack into the other port you haven’t used before and check for the problem. This method is to check whether this issue is related to the port or not. Using a separate port might fix your issue, but you will have to fix the port.
Reinstall Your Windows
As you have tried all the above methods but still have the issue, the last thing to try is by reinstalling your Windows operating system. Before reinstalling Windows, you should take a backup of your important files. So download a new and the latest copy of Windows from the Microsoft official website and make a bootable drive and reinstall the Windows os on your computer.
Conclusion
After this, your sound crackling issue will be fixed, and you will be able to enjoy the full sound quality of your audio device. So these are the methods you can try if you face sound crackling issues in the future as well. In case any of the above methods does not work for you, that means your audio device has some physical issues, and you have to take it to the service center. Besides you can comment down below if you don’t understand any of the above methods, and we will get back to you as soon as possible.


