Computers are a part of our lives now, which we couldn’t imagine a few years ago. We currently do office work, attend classes, watch movies, and do many more things. The ongoing pandemic has shown how important computers are. The PC market has seen exceptional growth in the last 1-2 years. So if you are going to buy a new computer in the upcoming days, it is important to know what specifications that computer has before going to buy a new computer.
Similarly, you should know the specifications if you are going to sell your desktop or laptop, to be easier for you to set the best price. That is why we are going to discuss all the possible ways to check different components. We are going to give you all the possible ways to check specifications while not even touching those components. So go through this article, and you can also save this article for future reference. All the methods are applicable to both desktops and laptops. So you don’t have to worry about that. Without further delay, keep scrolling and go through this article.
How to Check Specifications on a Windows Computer/Laptop
Go through this article, and you will have a clear idea of how you can check your computer’s specifications. However, we have tested these methods on a Windows laptop, but it should also work on a Windows PC in a similar way. So, don’t worry if you own a Windows computer instead of a laptop.
How to Check the Processor
Every computer comes with a processor. Without it, no computer will run. So the processor is one of the main important components, and you might want to know about the processor, like generation, clock speed, cache memory, and many other things. You should also check the processor’s capabilities before downloading any high-end programs or games; in case your computer’s processor is not supported, then you will know before downloading that program. It is quite easy to get all the information without opening or performing any physical activity. To check the Processor on the Windows Operating system –
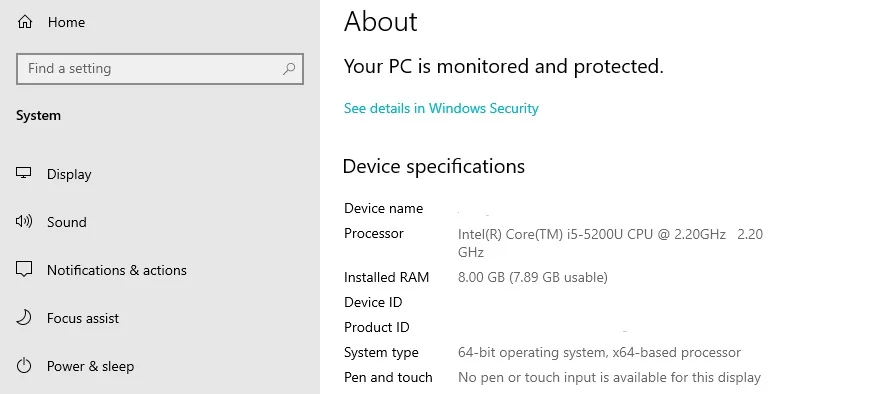
- At first, turn on your computer and wait for some time for every program to start running. Then Right-click on the Windows start menu, and you will get many options on a pop-up menu.
- There will be an option named System. So click on that to go forward.
- Now it will open the About section in Settings, where you will have all the details about the processor.
- You can also search for Settings on the Windows search bar.
- In the Settings menu, go to System, then scroll all the way down and click on the About section. There you will see all the processor-related details.
There is another way to check the processor. For that-

- Similarly, type System Information in the Windows search bar and press the Enter key to select the matching result, and it will open a new window.
- Next, click on the System Summary on the left side panel, and you will see a section named Processor, which will show all the information.
Besides these two methods, you can also check the processor from the Task Manager and open the Device Manager.
How to Check the Graphics Card(GPU)
Like the processor, every computer comes with a graphics card. It can be a dedicated GPU, but it can also be an integrated GPU. Most low-budget desktops and laptops are equipped with integrated graphics cards. These integrated GPUs are suitable for routine tasks, but you will need a dedicated GPU for gaming and other high-end work. That is why you should check what type of GPU you have on your computer before downloading it on your computer. To check that-
- As usual, turn on your computer first.
- After that, type Device Manager in the Windows search bar and press Enter by selecting the search result.
- You can also right-click on the Windows Start menu icon. On the pop-up menu, you will also get the Device Manager option.
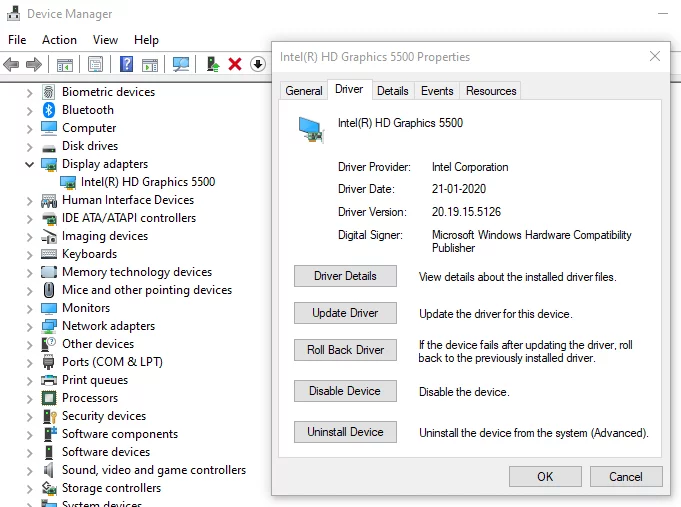
- After opening the Device Manager, you will see all the Drivers installed on your computer, and you should also see the Display adapters drop-down menu.
(If you don’t know drivers, then Windows computers are designed to support different components from different manufacturers. Therefore, every component is primarily handled by the specifically built driver by that manufacturer.)
- So click on that, and it will show the graphics card driver. Then right-click on that driver and click on the Properties option.
- Next, go to the Driver tab, which is present at the top. From the naming, you will understand what type of graphics card you have on your computer.
If you see two drivers in the Display Adapters section, that means you have both an integrated and a dedicated graphics card. Now, look at the names. If you have an Intel processor, you will most likely have an Intel Integrated graphics card like Intel HD Graphics 5000. Besides, AMD processor-powered computers will have AMD Radeon integrated graphics cards. On the other hand, you will see another GPU name from Nvidia or AMD if your computer has a dedicated graphics card. This way, you will be able to check the specifications of the GPU on the computer.
How to Check the Motherboard
You can say that the motherboard is the main component of a computer because you will add everything to the motherboard to run the computer. Besides, it is also important to check the specifications before upgrading, as they might not be supported. So you might be thinking already that you have to open the computer or laptop back cover to check what type of motherboard or from which company your computer has.
But you can check the motherboard specifications without opening the computer. There are different motherboard manufacturers like MSI, ASUS, and GigaByte. Besides them, you will also see HP, Dell, and other motherboards inside laptops.
To find out all the details of the motherboard of your computer-

- First, turn on the desktop or laptop as usual, type System Information in the Windows search bar, and press the Enter key.
- In the newly opened window, you will see a bunch of options on the left side. They click on the System Summary.
- After that, it will show a lot of information on the right-side panel. Now scroll down until you see the Baseboard Manufacturer section. This should show the motherboard manufacturer of your computer.
The cons of this process are that it will not give you the full details because every motherboard has a specific model number written on the motherboard itself, like the ASUS Z370-A. To know, you have to open the computer. Other than that, you will get all the basic information by going through this process.
How to Check Random Access Memory(RAM)
RAM, or Random Access Memory, is another important component of a computer. Many programs need a large amount of free RAM space to function properly. It is better to check the total RAM capacity before installing a particular program. The ideal situation is to have at least 8GB of RAM installed. However, you can add more RAM if you want. So to check how much RAM you have, you have to open some settings panels. For that-
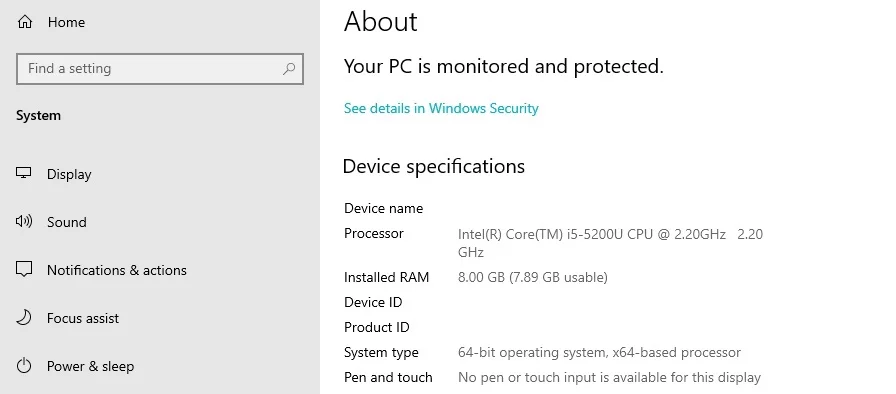
- First type Settings in the Windows search bar and click on the exact search result.
- Now you will see a lot of options as usual, but click on the System, which will open a lot of new options as well.
- On the left side, there are quite a few options, and you have to scroll down till the end, and you will see the ‘About’ option.
- So click on that, and it will show all basic system specifications, including the RAM capacity.
Another way of checking the RAM capacity is by opening the Task Manager.
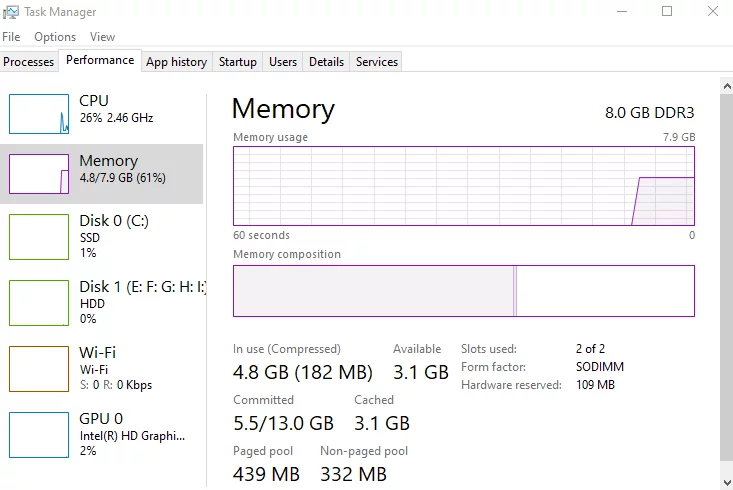
- Search for Task Manager in the search bar.
- After opening, go to the Performance tab present on the top and click on the Memory section present on the left side panel.
- Then it will show the full capacity in the top right corner with total real-time usage as well.
In these two ways, you can check your computer’s RAM easily. Besides that, Task Manager will also show how many slots for RAM your computer has.
How to Check the Storage Type
At first, it might seem like storage is not that important, but your computer will not run faster until you pair the fast processor with a faster storage drive. Speaking of storage types, there are mainly two types of technology used right now, and the faster version is the Solid State Drive or SSD. Earlier, most computers arrived with Hard drives that had physical moving parts. But SSD is more like a bigger version of those small memory cards. Although many computers still come with hard drives, people also use them to store normal files. So to check what type of Storage drive you have-
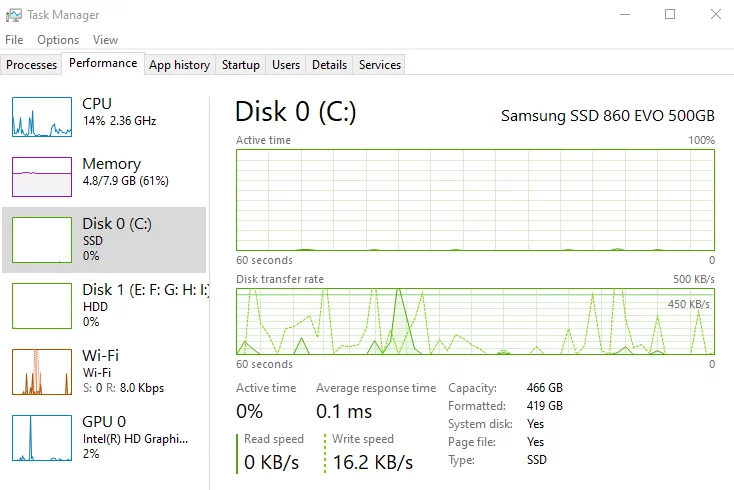
- Type Task Manager in the Windows search bar and search for it.
- After opening the Task Manager, you will see some tabs at the top. So go to the Performance tab.
- Then there will be a Disk section on the left side panel, and click on that.
- Now look closely at the bottom right, and there will be the disk-type written. If it says SSD, that means you have a fast Solid State Drive. Other than that, it will show HDD, which is a Hard drive.
If you see more than one drive showing on the Task Manager, you have more than one drive on your computer. In that case, you will need to check them individually by clicking on them. Besides this method, you can also check through the Device Manager. So search for it on the Windows Search bar and click on the Disk Drives drop-down option. You will see the storage drive, and the name will also be written.
How to Check Display Resolution
Without a display, it is impossible to use a computer. Laptops come with an inbuilt display, while you will have to buy an external display along with desktop computers. Although you will see the resolution on the display package, you might want to verify it. For that, you have to check after turning on the computer.
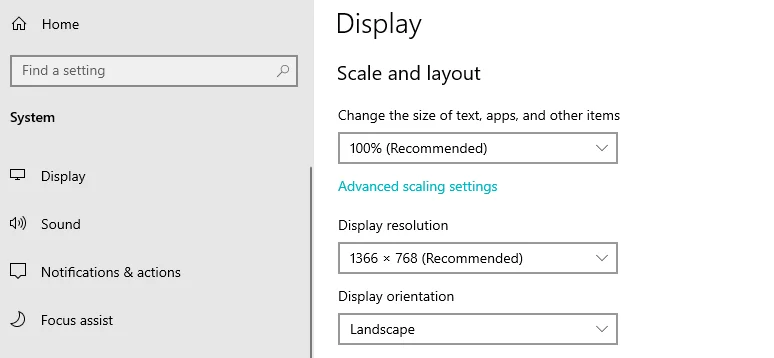
- As usual, turn on your computer and go to Settings by typing in the search bar.
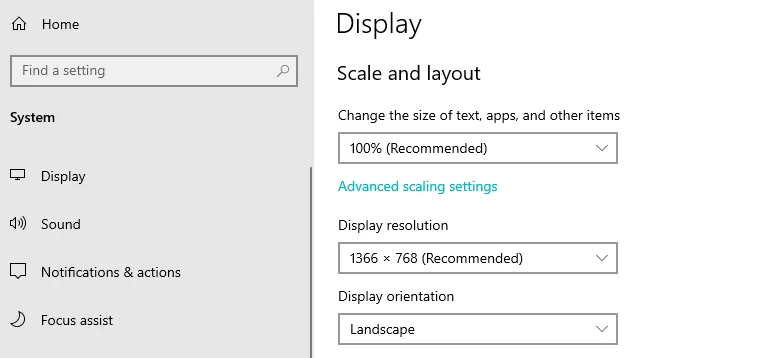
- After opening, go to the System section. Now it will automatically open the display section.
- So check for the Display Resolution option under the Scale and Layout section. There, you will see the resolution your display is running at.
- You can also change the resolution from there if you want.
Another way of checking the display resolution is through the System Information panel.
- So type System Information in the search bar and press the enter key.
- It will open the panel and double-click on the Components option.
- Then you will see the Display option, and it will show the resolution on the right-side panel along with other details as well.
How to Check the Network Adapter
Computers need a separate networking card to use Wi-Fi and Bluetooth connectivity features. It only handles the connectivity and connection speeds. So if you have a better network card, you will most likely get better connection stability and speed. That is why it is quite important to check this when buying any computer. While almost all desktops offer upgradability, most laptops do not. So to check the network card-
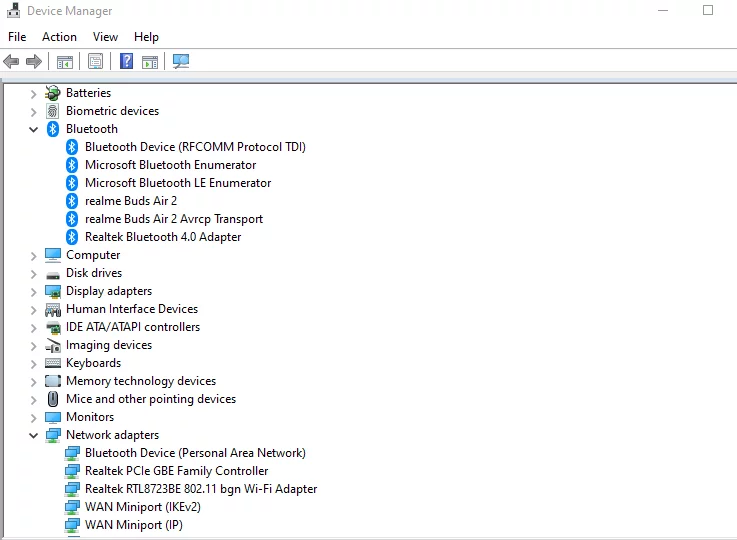
- Search for the Device Manager from the Windows search bar and open the Device Manager.
- After that, you will see two drop-down menus – Bluetooth and Network Adapters. So click on them respectively, and you will get all the information.
- You can also select a particular driver and go to Properties to see other adapter details as well.
There is another way to check the Network adapter. For that-
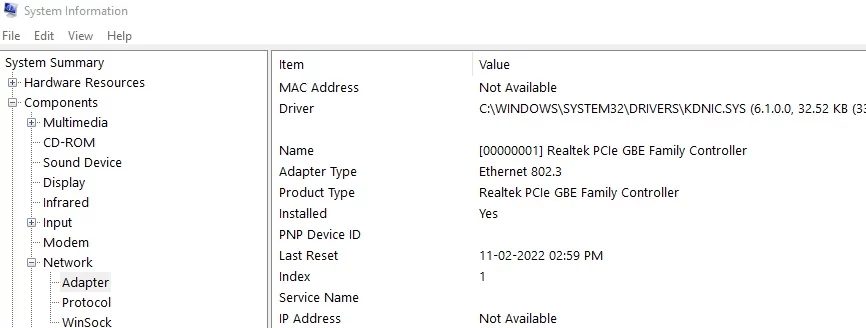
- You have to search for System Information. Then double-click on the Components section present on the left side panel.
- Inside that, you will see the Network section. So double-click on that again and then click on the Adapter option.
- Now you will get all the adapter-related details.
Conclusion
Knowing the specifications is as important as doing things on the computer. If you don’t know about your computer, you are obviously lacking many things. Speaking of those things, specifications are important when installing a power-hungry program. If your computer does not have capable specifications, you will waste time installing that program. Besides that, everyone should research different specifications when going to buy a new desktop or laptop. Similarly, you have to know the specifications to set the best price while selling your computer.
You can go through all the above methods to check the specifications. But many third-party programs can show all the specifications at once. You wouldn’t need to go through all the different menus by using them. Such programs are CPU-Z, Speccy, and HWInfo. These programs are specifically made to show computer specifications. So you can use them as well to check your computer. If you have any doubts or questions to ask, scroll down to the comment box, and we will surely get back to you as soon as possible.


